Light Propagation Volumes (LPV) is an algorithm for achieving an indirect light bounce developed by Crytek and (previously) used in CryEngine 3. Having read numerous papers and articles (listed below), looked through code on GitHub (also listed below), I was disapppointed that there was a lack of clear information on how the algorithm works technically. This article aims to provide an insight in how the algorithm works and how I have implemented it in the engine I am working on for a school project.
What does LPV do?
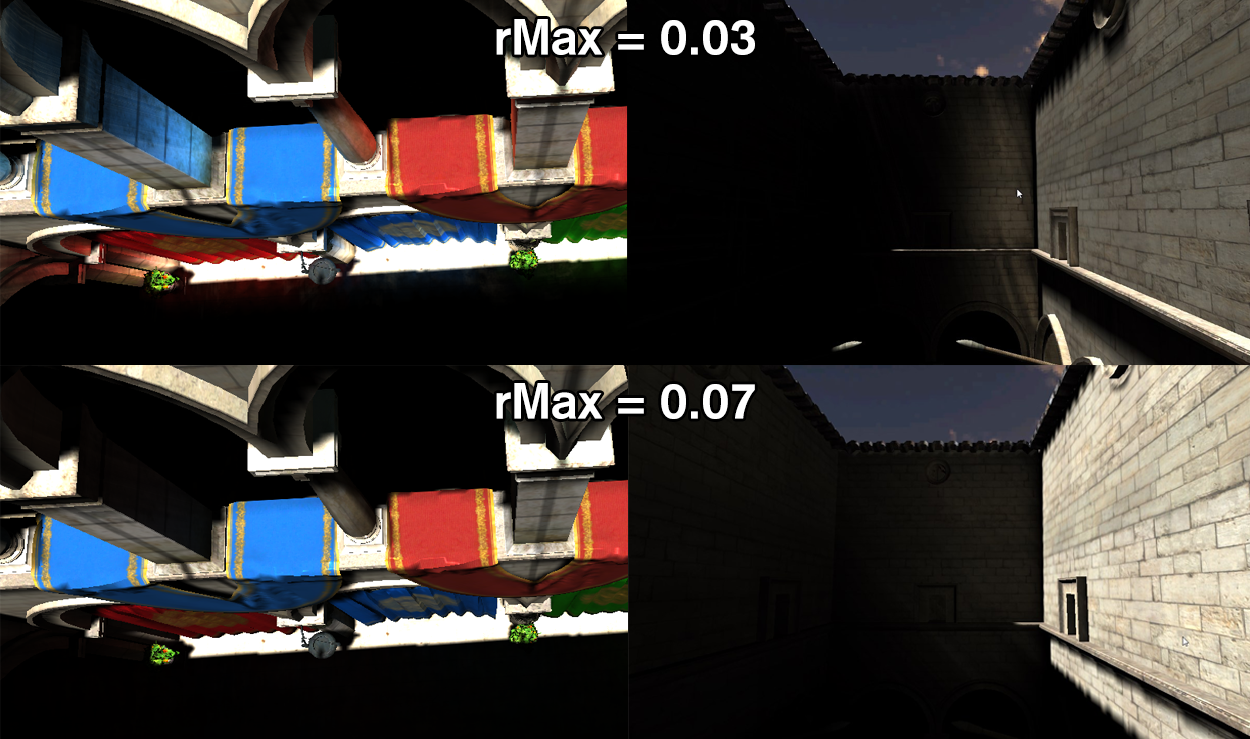
Light Propagation Volumes stores lighting information from a light in a 3D grid. Every light stores which points in the world they light up. These points have a coordinate in the world, which means you can stratify those coordinates in a grid. In that way you save lit points (Virtual Point Lights) in a 3D grid and can use those initial points to spread light across the scene. You can imagine the spreading of lights as covering your sandwich in Nutella. You start off with an initial lump of Nutella (virtual point lights) and use a knife to spread (propagate) this across the entire sandwich (the entire scene). It’s a bit more complex than that, but that will become clear very soon. The images below demonstrates what LPV adds to a scene.

How does it do that?
Injection
The first step is to gather the Virtual Point Lights (VPLs). In a previous article I describe Reflective Shadow Maps. For my implementation I used the flux, world-space position, and world-space normal map resulting from rendering the Reflective Shadow Map. The flux is the color of the indirect light getting injected, the world-space position is used to determine the grid cell, and the normal determines the initial propagation direction.
Not every pixel in the RSM will be used for injection in the grid, because this would mean you inject 2048×2048=4194304 VPLs for a decently sized RSM for a directional light. Performance was decent, but that was only with one light. Some intelligent down-sampling (to 512×512) still gives pretty and stable results.
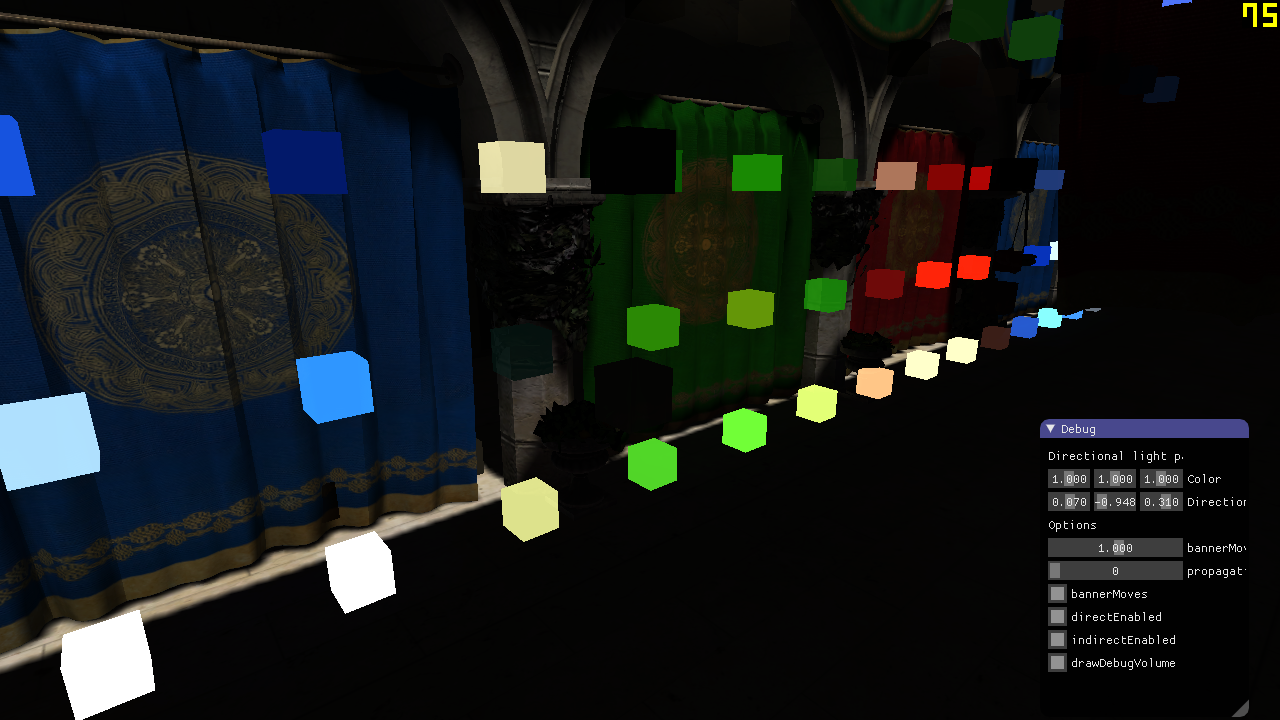
The image below demonstrates the resulting 3D grid after the Injection phase. With a white light, the colors of the VPLs are very similar to the surface they are bounced off of.
Storage
To maximize efficiency and frame rate, the algorithm stores the lighting information in Spherical Harmonics (SH). Those are mathematical objects used to record an incoming signal (like light intensity) over a sphere. The internal workings of this are still a bit of a mystery to me, but important is to know that you can encode light intensities and directions in Spherical Harmonics, allowing for propagation using just 4 floats per color channel. Implementation details will become apparent soon.
Propagation
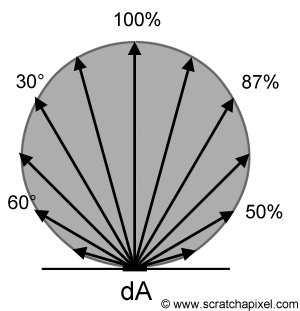
So, we have a grid filled with Virtual Point Lights and we want to “smear” them across the scene to get pretty light bleeding. As I mentioned earlier, we store SH coefficients in grid cells. These SH coefficients represent a signal traveling in a certain direction. In the propagation phase, you calculate how much of that signal could spread to a neighbour cell using the direction towards that cell. Then you multiply this by a cosine lobe, a commonly used way to spread light in a diffuse manner. The image below shows such an object. Directions pointing “up” which is forward, has 100% intensity and directions pointing sideways or backwards have an intensity of 0%, because the light would not physically bounce in that direction.
Rendering
Rendering is actually the easy part. We have a set of SH coefficients per color component in each cell of our grid. We have a G-Buffer with world space positions and world space normals. We get the grid cell for the world space position (trilinear interpolation gives better results though) and evaluate the coefficients stored in the grid cells against the SH representation for the world space normal. This gives an intensity per color component, which you can multiply by the albedo (from the G-Buffer) and by the ambient occlusion factor, and then you have a pretty image.
How do you implement it?
Theoretically, the above is easy to understand. For the implementation it took me quite a while to know how I should do it. Below, I will explain how to set it up, how to execute each step, and what pitfalls I ran into. My code is written in a rendering API agnostic engine, but heavily inspired by DirectX 11.
Preparation
Start off by creating three 3D textures of float4, one per color channel, of dimensions 32 x 32 x 32 (this can be anything you want, but you will get pretty results with as small dimensions as this). These buffers need read and write access, so I created Unordered Access Views, Render Target Views, and Shader Resource Views for them. RTVs for the injection phase, UAVs for clearing and the propagation phase, and SRVs for the rendering phase. Make sure you clear these textures every frame.
Injection
Injecting the lights was something I struggled with for quite some time. I saw people use a combination of Vertex, Geometry, and Pixel Shaders to inject lights into a 3D texture and I thought, why not just use a single Compute Shader to pull this off? You will run into race conditions if you do this and there is no straight forward way to pull it off in Compute Shaders. A less straight forward solution was using a GPU linked list and solve that list in a separate pass. Unfortunately, this was too slow for me and I am always a bit cautious to have a while loop in a shader.
So, the fastest way to get light injection done is by setting up the VS/GS/PS draw call. The reason this works is because the fixed-function blending on the GPU is thread-safe and performed in the same order every frame. This means you can blend VPLs in a grid cell without race conditions!
Vertex Shader
Using DrawArray you can specify the amount of vertices you would like the application to render. I down-sample a 2048×2048 texture to 512×512 “vertices” and that is the count I give the DrawArray call. These vertices don’t need any CPU-side info, you will only need the vertex ID. I have listed the entire shader below. This shader passes VPLs through to the Geometry Shader.
[code lang=”cpp”]#define LPV_DIM 32
#define LPV_DIMH 16
#define LPV_CELL_SIZE 4.0
// https://github.com/mafian89/Light-Propagation-Volumes/blob/master/shaders/lightInject.frag and
// https://github.com/djbozkosz/Light-Propagation-Volumes/blob/master/data/shaders/lpvInjection.cs seem
// to use the same coefficients, which differ from the RSM paper. Due to completeness of their code, I will stick to their solutions.
/*Spherical harmonics coefficients – precomputed*/
#define SH_C0 0.282094792f // 1 / 2sqrt(pi)
#define SH_C1 0.488602512f // sqrt(3/pi) / 2
/*Cosine lobe coeff*/
#define SH_cosLobe_C0 0.886226925f // sqrt(pi)/2
#define SH_cosLobe_C1 1.02332671f // sqrt(pi/3)
#define PI 3.1415926f
#define POSWS_BIAS_NORMAL 2.0
#define POSWS_BIAS_LIGHT 1.0
struct Light
{
float3 position;
float range;
//————————16 bytes
float3 direction;
float spotAngle;
//————————16 bytes
float3 color;
uint type;
};
cbuffer b0 : register(b0)
{
float4x4 vpMatrix;
float4x4 RsmToWorldMatrix;
Light light;
};
int3 getGridPos(float3 worldPos)
{
return (worldPos / LPV_CELL_SIZE) + int3(LPV_DIMH, LPV_DIMH, LPV_DIMH);
}
struct VS_IN {
uint posIndex : SV_VertexID;
};
struct GS_IN {
float4 cellIndex : SV_POSITION;
float3 normal : WORLD_NORMAL;
float3 flux : LIGHT_FLUX;
};
Texture2D rsmFluxMap : register(t0);
Texture2D rsmWsPosMap : register(t1);
Texture2D rsmWsNorMap : register(t2);
struct RsmTexel
{
float4 flux;
float3 normalWS;
float3 positionWS;
};
float Luminance(RsmTexel rsmTexel)
{
return (rsmTexel.flux.r * 0.299f + rsmTexel.flux.g * 0.587f + rsmTexel.flux.b * 0.114f)
+ max(0.0f, dot(rsmTexel.normalWS, -light.direction));
}
RsmTexel GetRsmTexel(int2 coords)
{
RsmTexel tx = (RsmTexel)0;
tx.flux = rsmFluxMap.Load(int3(coords, 0));
tx.normalWS = rsmWsNorMap.Load(int3(coords, 0)).xyz;
tx.positionWS = rsmWsPosMap.Load(int3(coords, 0)).xyz + (tx.normalWS * POSWS_BIAS_NORMAL);
return tx;
}
#define KERNEL_SIZE 4
#define STEP_SIZE 1
GS_IN main(VS_IN input) {
uint2 RSMsize;
rsmWsPosMap.GetDimensions(RSMsize.x, RSMsize.y);
RSMsize /= KERNEL_SIZE;
int3 rsmCoords = int3(input.posIndex % RSMsize.x, input.posIndex / RSMsize.x, 0);
// Pick brightest cell in KERNEL_SIZExKERNEL_SIZE grid
float3 brightestCellIndex = 0;
float maxLuminance = 0;
{
for (uint y = 0; y < KERNEL_SIZE; y += STEP_SIZE)
{
for (uint x = 0; x < KERNEL_SIZE; x += STEP_SIZE)
{
int2 texIdx = rsmCoords.xy * KERNEL_SIZE + int2(x, y);
RsmTexel rsmTexel = GetRsmTexel(texIdx);
float texLum = Luminance(rsmTexel);
if (texLum > maxLuminance)
{
brightestCellIndex = getGridPos(rsmTexel.positionWS);
maxLuminance = texLum;
}
}
}
}
RsmTexel result = (RsmTexel)0;
float numSamples = 0;
for (uint y = 0; y < KERNEL_SIZE; y += STEP_SIZE)
{
for (uint x = 0; x < KERNEL_SIZE; x += STEP_SIZE)
{
int2 texIdx = rsmCoords.xy * KERNEL_SIZE + int2(x, y);
RsmTexel rsmTexel = GetRsmTexel(texIdx);
int3 texelIndex = getGridPos(rsmTexel.positionWS);
float3 deltaGrid = texelIndex – brightestCellIndex;
if (dot(deltaGrid, deltaGrid) < 10) // If cell proximity is good enough
{
// Sample from texel
result.flux += rsmTexel.flux;
result.positionWS += rsmTexel.positionWS;
result.normalWS += rsmTexel.normalWS;
++numSamples;
}
}
}
//if (numSamples > 0) // This is always true due to picking a brightestCell, however, not all cells have light
//{
result.positionWS /= numSamples;
result.normalWS /= numSamples;
result.normalWS = normalize(result.normalWS);
result.flux /= numSamples;
//RsmTexel result = GetRsmTexel(rsmCoords.xy);
GS_IN output;
output.cellIndex = float4(getGridPos(result.positionWS), 1.0);
output.normal = result.normalWS;
output.flux = result.flux.rgb;
return output;
}[/code]
Geometry shader
Because of the way DirectX11 handles Render Target Views for 3D textures, you need to pass the vertices to a Geometry Shader, where a depth slice of the 3D texture will be determined based on the grid position. In the Geometry Shader you specify the SV_renderTargetArrayIndex, a variable you have to pass to the Pixel Shader and a variable that is not accessible in the Vertex Shader. This explains why you need the Geometry Shader and not just do a VS->PS call. I have listed the Geometry Shader below.
[code lang=”cpp”]#define LPV_DIM 32
#define LPV_DIMH 16
#define LPV_CELL_SIZE 4.0
struct GS_IN {
float4 cellIndex : SV_POSITION;
float3 normal : WORLD_NORMAL;
float3 flux : LIGHT_FLUX;
};
struct PS_IN {
float4 screenPos : SV_POSITION;
float3 normal : WORLD_NORMAL;
float3 flux : LIGHT_FLUX;
uint depthIndex : SV_RenderTargetArrayIndex;
};
[maxvertexcount(1)]
void main(point GS_IN input[1], inout PointStream<PS_IN> OutputStream) {
PS_IN output;
output.depthIndex = input[0].cellIndex.z;
output.screenPos.xy = (float2(input[0].cellIndex.xy) + 0.5) / float2(LPV_DIM, LPV_DIM) * 2.0 – 1.0;
// invert y direction because y points downwards in the viewport?
output.screenPos.y = -output.screenPos.y;
output.screenPos.zw = float2(0, 1);
output.normal = input[0].normal;
output.flux = input[0].flux;
OutputStream.Append(output);
}[/code]
Pixel Shader
The Pixel Shader for injection is not much more than scaling the SH coefficients resulting from the input world space normal by the input flux per color component. It writes to three separate render targets, one per color component.
[code lang=”cpp”]
// https://github.com/mafian89/Light-Propagation-Volumes/blob/master/shaders/lightInject.frag and
// https://github.com/djbozkosz/Light-Propagation-Volumes/blob/master/data/shaders/lpvInjection.cs seem
// to use the same coefficients, which differ from the RSM paper. Due to completeness of their code, I will stick to their solutions.
/*Spherical harmonics coefficients – precomputed*/
#define SH_C0 0.282094792f // 1 / 2sqrt(pi)
#define SH_C1 0.488602512f // sqrt(3/pi) / 2
/*Cosine lobe coeff*/
#define SH_cosLobe_C0 0.886226925f // sqrt(pi)/2
#define SH_cosLobe_C1 1.02332671f // sqrt(pi/3)
#define PI 3.1415926f
struct PS_IN {
float4 screenPosition : SV_POSITION;
float3 normal : WORLD_NORMAL;
float3 flux : LIGHT_FLUX;
uint depthIndex : SV_RenderTargetArrayIndex;
};
struct PS_OUT {
float4 redSH : SV_Target0;
float4 greenSH : SV_Target1;
float4 blueSH : SV_Target2;
};
float4 dirToCosineLobe(float3 dir) {
//dir = normalize(dir);
return float4(SH_cosLobe_C0, -SH_cosLobe_C1 * dir.y, SH_cosLobe_C1 * dir.z, -SH_cosLobe_C1 * dir.x);
}
float4 dirToSH(float3 dir) {
return float4(SH_C0, -SH_C1 * dir.y, SH_C1 * dir.z, -SH_C1 * dir.x);
}
PS_OUT main(PS_IN input)
{
PS_OUT output;
const static float surfelWeight = 0.015;
float4 coeffs = (dirToCosineLobe(input.normal) / PI) * surfelWeight;
output.redSH = coeffs * input.flux.r;
output.greenSH = coeffs * input.flux.g;
output.blueSH = coeffs * input.flux.b;
return output;
}
[/code]
Propagation
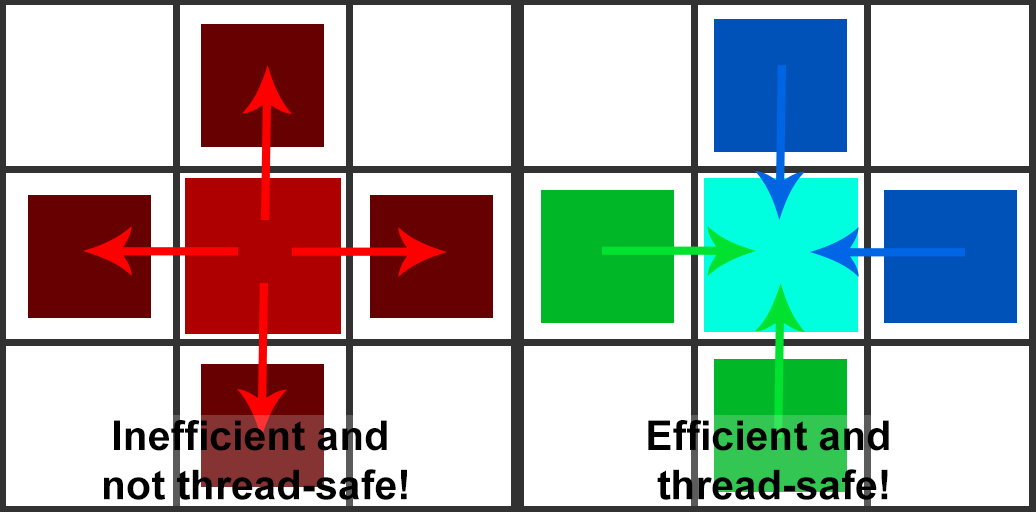
So, now we have a grid partially filled with VPLs resulting from the Injection phase. It’s time to distribute that light. When you think about distribution, you spread something from a central point. In the propagation Compute Shader, you would spread light to all surrounding directions per cell. However, this is horribly cache inefficient and prone to race conditions. This is because you sample (read) from one cell and propagate (write) to surrounding cells. This means cells are being accessed by multiple threads simultaneously. Instead of this approach, we use a Gathering algorithm. This means you sample from all surrounding directions and write to only one. This guarantees only one thread is accessing one grid cell at the same time.
Now, for the propagation itself. I will describe how the distribution would work, not how the gathering would work. This is because it is easier to explain. The code below will show how it works for gathering. This process describes how it works for propagation to one cell. To other cells is the same process with other directions.
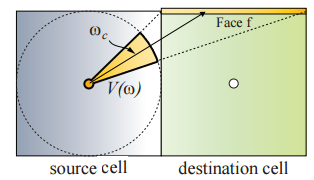
The direction towards the neighbour cell is projected into Spherical Harmonics and evaluated against the stored SH coefficients in the current cell. This cancels out lighting going in other directions. There is a problem with this approach though. We are propagating spherical lighting information through a cubic grid. Try imagining a sphere inside a cube, there are quite some gaps. These gaps will also be visible in the final rendering as unlit spots. The way to fix this is by projecting the light onto the faces of the cell you are propagating it to.
The image below (borrowed from CLPV paper) demonstrates this. The yellow part is the solid angle, which is the part of the sphere used to light, and also what determines how much light is distributed towards a certain face. You need to do this for 5 faces (not the front one, all others) so you cover the entire cube. This preserves directional information (for improved spreading) so results are better lit and you don’t have those ugly unlit spots.
The (compute) shader below demonstrates how propagation works in a gathering way, and how the side-faces are used for the accumulation as well.
[code lang=”cpp”]#define LPV_DIM 32
#define LPV_DIMH 16
#define LPV_CELL_SIZE 4.0
int3 getGridPos(float3 worldPos)
{
return (worldPos / LPV_CELL_SIZE) + int3(LPV_DIMH, LPV_DIMH, LPV_DIMH);
}
// https://github.com/mafian89/Light-Propagation-Volumes/blob/master/shaders/lightInject.frag and
// https://github.com/djbozkosz/Light-Propagation-Volumes/blob/master/data/shaders/lpvInjection.cs seem
// to use the same coefficients, which differ from the RSM paper. Due to completeness of their code, I will stick to their solutions.
/*Spherical harmonics coefficients – precomputed*/
#define SH_c0 0.282094792f // 1 / 2sqrt(pi)
#define SH_c1 0.488602512f // sqrt(3/pi) / 2
/*Cosine lobe coeff*/
#define SH_cosLobe_c0 0.886226925f // sqrt(pi)/2
#define SH_cosLobe_c1 1.02332671f // sqrt(pi/3)
#define Pi 3.1415926f
float4 dirToCosineLobe(float3 dir) {
//dir = normalize(dir);
return float4(SH_cosLobe_c0, -SH_cosLobe_c1 * dir.y, SH_cosLobe_c1 * dir.z, -SH_cosLobe_c1 * dir.x);
}
float4 dirToSH(float3 dir) {
return float4(SH_c0, -SH_c1 * dir.y, SH_c1 * dir.z, -SH_c1 * dir.x);
}
// End of common.hlsl.inc
RWTexture3D<float4> lpvR : register(u0);
RWTexture3D<float4> lpvG : register(u1);
RWTexture3D<float4> lpvB : register(u2);
static const float3 directions[] =
{ float3(0,0,1), float3(0,0,-1), float3(1,0,0), float3(-1,0,0) , float3(0,1,0), float3(0,-1,0)};
// With a lot of help from: http://blog.blackhc.net/2010/07/light-propagation-volumes/
// This is a fully functioning LPV implementation
// right up
float2 side[4] = { float2(1.0, 0.0), float2(0.0, 1.0), float2(-1.0, 0.0), float2(0.0, -1.0) };
// orientation = [ right | up | forward ] = [ x | y | z ]
float3 getEvalSideDirection(uint index, float3x3 orientation) {
const float smallComponent = 0.4472135; // 1 / sqrt(5)
const float bigComponent = 0.894427; // 2 / sqrt(5)
const float2 s = side[index];
// *either* x = 0 or y = 0
return mul(orientation, float3(s.x * smallComponent, s.y * smallComponent, bigComponent));
}
float3 getReprojSideDirection(uint index, float3x3 orientation) {
const float2 s = side[index];
return mul(orientation, float3(s.x, s.y, 0));
}
// orientation = [ right | up | forward ] = [ x | y | z ]
float3x3 neighbourOrientations[6] = {
// Z+
float3x3(1, 0, 0,0, 1, 0,0, 0, 1),
// Z-
float3x3(-1, 0, 0,0, 1, 0,0, 0, -1),
// X+
float3x3(0, 0, 1,0, 1, 0,-1, 0, 0
),
// X-
float3x3(0, 0, -1,0, 1, 0,1, 0, 0),
// Y+
float3x3(1, 0, 0,0, 0, 1,0, -1, 0),
// Y-
float3x3(1, 0, 0,0, 0, -1,0, 1, 0)
};
[numthreads(16, 2, 1)]
void main(uint3 dispatchThreadID: SV_DispatchThreadID, uint3 groupThreadID : SV_GroupThreadID)
{
uint3 cellIndex = dispatchThreadID.xyz;
// contribution
float4 cR = (float4)0;
float4 cG = (float4)0;
float4 cB = (float4)0;
for (uint neighbour = 0; neighbour < 6; ++neighbour)
{
float3x3 orientation = neighbourOrientations[neighbour];
// TODO: transpose all orientation matrices and use row indexing instead? ie int3( orientation[2] )
float3 mainDirection = mul(orientation, float3(0, 0, 1));
uint3 neighbourIndex = cellIndex – directions[neighbour];
float4 rCoeffsNeighbour = lpvR[neighbourIndex];
float4 gCoeffsNeighbour = lpvG[neighbourIndex];
float4 bCoeffsNeighbour = lpvB[neighbourIndex];
const float directFaceSubtendedSolidAngle = 0.4006696846f / Pi / 2;
const float sideFaceSubtendedSolidAngle = 0.4234413544f / Pi / 3;
for (uint sideFace = 0; sideFace < 4; ++sideFace)
{
float3 evalDirection = getEvalSideDirection(sideFace, orientation);
float3 reprojDirection = getReprojSideDirection(sideFace, orientation);
float4 reprojDirectionCosineLobeSH = dirToCosineLobe(reprojDirection);
float4 evalDirectionSH = dirToSH(evalDirection);
cR += sideFaceSubtendedSolidAngle * dot(rCoeffsNeighbour, evalDirectionSH) * reprojDirectionCosineLobeSH;
cG += sideFaceSubtendedSolidAngle * dot(gCoeffsNeighbour, evalDirectionSH) * reprojDirectionCosineLobeSH;
cB += sideFaceSubtendedSolidAngle * dot(bCoeffsNeighbour, evalDirectionSH) * reprojDirectionCosineLobeSH;
}
float3 curDir = directions[neighbour];
float4 curCosLobe = dirToCosineLobe(curDir);
float4 curDirSH = dirToSH(curDir);
int3 neighbourCellIndex = (int3)cellIndex + (int3)curDir;
cR += directFaceSubtendedSolidAngle * max(0.0f, dot(rCoeffsNeighbour, curDirSH)) * curCosLobe;
cG += directFaceSubtendedSolidAngle * max(0.0f, dot(gCoeffsNeighbour, curDirSH)) * curCosLobe;
cB += directFaceSubtendedSolidAngle * max(0.0f, dot(bCoeffsNeighbour, curDirSH)) * curCosLobe;
}
lpvR[dispatchThreadID.xyz] += cR;
lpvG[dispatchThreadID.xyz] += cG;
lpvB[dispatchThreadID.xyz] += cB;
}[/code]
Rendering
Rendering is pretty straight forward. You use the G-Buffer’s world space position to get a grid position. If you have those positions as floats, you can easily do trilinear sampling on the three 3D textures used for LPV. With that sampling result you have a set of Spherical Harmonics and you project the world space normal from the G-Buffer into SH and do dot products against the three textures to get scalar values per color component. Multiply that by the albedo and the Ambient Occlusion factor and you have indirect lighting.
The pixel shader below demonstrates this. This is done by rendering a full screen quad and evaluating all pixels. If you have occlusion culling, you can optimize the indirect light rendering by adding it in the G-Buffer phase in a light accumulation buffer, but in my implementation I have a lot of overdraw and no early-Z/occlusion culling.
[code lang=”cpp”]
<pre>// Start of common.hlsl.inc
#define LPV_DIM 32
#define LPV_DIMH 16
#define LPV_CELL_SIZE 4.0
int3 getGridPos(float3 worldPos)
{
return (worldPos / LPV_CELL_SIZE) + int3(LPV_DIMH, LPV_DIMH, LPV_DIMH);
}
float3 getGridPosAsFloat(float3 worldPos)
{
return (worldPos / LPV_CELL_SIZE) + float3(LPV_DIMH, LPV_DIMH, LPV_DIMH);
}
// https://github.com/mafian89/Light-Propagation-Volumes/blob/master/shaders/lightInject.frag and
// https://github.com/djbozkosz/Light-Propagation-Volumes/blob/master/data/shaders/lpvInjection.cs seem
// to use the same coefficients, which differ from the RSM paper. Due to completeness of their code, I will stick to their solutions.
/*Spherical harmonics coefficients – precomputed*/
#define SH_C0 0.282094792f // 1 / 2sqrt(pi)
#define SH_C1 0.488602512f // sqrt(3/pi) / 2
/*Cosine lobe coeff*/
#define SH_cosLobe_C0 0.886226925f // sqrt(pi)/2
#define SH_cosLobe_C1 1.02332671f // sqrt(pi/3)
#define PI 3.1415926f
float4 dirToCosineLobe(float3 dir) {
//dir = normalize(dir);
return float4(SH_cosLobe_C0, -SH_cosLobe_C1 * dir.y, SH_cosLobe_C1 * dir.z, -SH_cosLobe_C1 * dir.x);
}
float4 dirToSH(float3 dir) {
return float4(SH_C0, -SH_C1 * dir.y, SH_C1 * dir.z, -SH_C1 * dir.x);
}
// End of common.hlsl.inc
struct PSIn
{
float4 pos : SV_POSITION;
float3 normal : NORMAL;
float3 tangent : TANGENT;
float3 bitangent : BITANGENT;
float2 texcoord : TEXCOORD0;
float3 posWS : POSITION;
};
sampler trilinearSampler : register(s0);
Texture3D lpvR : register(t0);
Texture3D lpvG: register(t1);
Texture3D lpvB : register(t2);
Texture2D wsPosMap : register(t3);
Texture2D wsNorMap : register(t4);
Texture2D albedoMap : register(t5);
Texture2D ambientOcclusionMap : register(t6);
float4 main(PSIn IN) : SV_Target
{
float3 albedo = albedoMap.Sample(trilinearSampler, IN.texcoord).xyz;
float3 pxPosWS = wsPosMap.Sample(trilinearSampler, IN.texcoord).xyz;
float3 pxNorWS = wsNorMap.Sample(trilinearSampler, IN.texcoord).xyz;
float3 gridPos = getGridPosAsFloat(pxPosWS);
// https://github.com/mafian89/Light-Propagation-Volumes/blob/master/shaders/basicShader.frag
float4 SHintensity = dirToSH(-pxNorWS);
float3 lpvIntensity = (float3)0;
float4 lpvRtex = lpvR.SampleLevel(trilinearSampler, gridPos / float3(LPV_DIM, LPV_DIM, LPV_DIM), 0);
float4 lpvGtex = lpvG.SampleLevel(trilinearSampler, gridPos / float3(LPV_DIM, LPV_DIM, LPV_DIM), 0);
float4 lpvBtex = lpvB.SampleLevel(trilinearSampler, gridPos / float3(LPV_DIM, LPV_DIM, LPV_DIM), 0);
lpvIntensity = float3(
dot(SHintensity, lpvRtex),
dot(SHintensity, lpvGtex),
dot(SHintensity, lpvBtex));
float3 finalLPVRadiance = max(0, lpvIntensity) / PI;
float4 result = float4(finalLPVRadiance, 1.0) * ambientOcclusionMap.Load(int3(IN.pos.xy, 0)).r * float4(albedo, 1.0);
return result;
}</pre>
[/code]
Pros and cons
This algorithm, like any other, has its pros and cons.
Pros
- The algorithm is very fast
- One data structure which can support multiple lights
- Completely dynamic and real-time
Cons
- The amount of SH coefficients used (4) has only about 75% accuracy. This means more objects will get incorrect lighting and light bleeding will happen in wrong places.
- Trade-off between more local reflections or more global reflection as the size of the grid influences this. Can be solved by using Cascaded LPVs.
- Does not allow for specular reflections. Can be added with Screen-Spaced Reflections.
- Only allows for one light bounce. There are workarounds, but that also has its tradeoffs.
Resources
- LPV paper by Crytek: http://www.crytek.com/download/Light_Propagation_Volumes.pdf
- Cascaded LPV paper, also better describing the propagation phase: http://www.crytek.com/download/20100301_lpv.pdf
- LPV implementation in OGRE paper: http://www.cse.chalmers.se/~uffe/xjobb/Master_Thesis_Johan_Elvek_20120701.pdf
- LPV implementations studied for insights: http://blog.blackhc.net/2010/07/light-propagation-volumes/ | https://github.com/djbozkosz/Light-Propagation-Volumes | https://github.com/mafian89/Light-Propagation-Volumes
Spherical Harmonics papers and posts:
- Stupid SH tricks (often referred to, helped a lot of people out, not me though): http://www.ppsloan.org/publications/StupidSH36.pdf
- SH for Beginners (helps to have a visual result and code): https://dickyjim.wordpress.com/2013/09/04/spherical-harmonics-for-beginners/
- SH paper by Sony: http://www.research.scea.com/gdc2003/spherical-harmonic-lighting.pdf
- Irradiance Environment Maps (describes how to use SH for environment mapping, was very helpful): https://cseweb.ucsd.edu/~ravir/papers/envmap/envmap.pdf