
This is my first post-mortem post. I will write about Micro Machines in 3D, an assignment I handed in last week for the second block of Programming at IGAD. This project features a lot of stuff I haven’t tried before. For instance, it uses QuadTrees for collision checking, it uses OpenGL and GLSL to render the models, and it uses a lot more smart pointers than I did before. In this post I will talk about several subjects that were relevant for the making of this project. I will talk about writing code for drawing 3D models using .OBJ’s, OpenGL, and GLSL. I will talk about optimizations, especially in collision testing and cull testing. I also ended up with a neat Singleton base-class which I would like to share. The first thing I’d like to talk about is Planning. Something I’ve worked on a lot this block. Planning | 3D Models | Shaders | Optimizing | Smart Pointers | Singletons | Conclusion
Planning
Planning has always been a thing I’ve neglected and thought of as something that would never work for me, since I’m quite chaotic. A lecture on planning triggered something in me to think “let’s just give it a shot”. I started off with listing all deadlines I had that block and then creating a few incomplete sprints, like the ones in SCRUM. I used Scrumy to keep an overview of things I still had to do and things that I should be doing. When those were complete, I started to fill in things in Google Calendar. When I received the assignment for PR2 (Programming), I immediately decided to make a 3D game. I knew this would cost me quite a large amount of time, which is why I wanted to plan this out from the start. I made a list of all things I wanted in the game and proceeded to create User Stories for them. 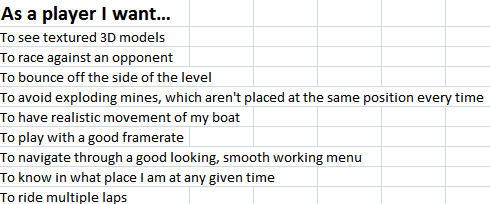 Apart from the racing against an opponent, everything on the image is in the game. After this, I created Sprint Backlogs, with hour estimations. I knew I had to spend about 20 hours a week to complete the project in time, with the estimations I made back then. The first few weeks, I stuck to my planning, getting things done in time and moving things forward. After about 3 weeks, I doubted if I was able to fit in an AI with pathfinding and I wanted to finish a cool, working project instead of just attempts at getting stuff to work. This led me to skip the AI and focus more on collisions, the art, and culling. This messed up the planning though. The Sprint Backlogs lost their use and I just made a planning every week, stating “Work on this assignment”, instead of specifying which task had to be done at what moment. The lack of specification made it easier for me to say “Not today! Time for video games.” I learnt that the effective part of planning is the specification. If I tell myself to do task X between 19:00 and 23:00, my planning will depend on me having done that. This forces me to work on it and actually keeps me motivated. I found sticking to my planning to be very motivating. The short bursts of excitement when you finish a task way in time is awesome.
3D models
The primary personal goal of this assignment was creating the game in 3D, instead of 2D. The framework I had to use was basically a software renderer at first. It did all the calculations on an array of integers and pushed that to the GPU as a texture on a quad. This is quite slow, so the first step was to edit this framework to use OpenGL quads for sprites. The framework used a quad for its rendering, which made it an excellent case study. I used OpenGL’s deprecated Immediate Mode at first for rendering those sprite quads. When I finally got a quad to draw with a texture on it, rotating along an arbitrary axis, it was time to start using perspective instead of an orthographic view. Prior to this assignment, I read parts of Beginning OpenGL Game Programming, a book I would recommend to anyone starting OpenGL. This book shows how easy it is to set up a perspective view. The problems I faced were in the clipping planes and in the aspect ratio. The code I had was:
[code language=”cpp”]gluPerspective(60, 800 / 600, -1, 1000);[/code]
The problem in the aspect ratio was (not only the lack of variable names) that integer division results in an integer. This means 800/600 results to 1. The second problem was the near-clipping plane, set to -1. When this is negative, the graphics become quite glitchy, because certain calculations can’t be done. Some calculations use a ratio between the near and far clipping plane for determining the depth. If it is set to -1, the ratio can’t be calculated correctly. Setting this to 0.001 fixed the problem. The correct version was:
[code language=”cpp”]gluPerspective(60, 800.0 / 600, 0.001, 1000);[/code]
By this time, I got a fancy quad rotating around the Y-axis, in perspective. The next step was loading a model. An easy-to-use and readable format is the .OBJ-format. This format is saved in ASCII (plain text) and there are some great tutorials for parsing these formats. After following this tutorial, I ran into a small issue. Drawing a 3D-object in Immediate Mode really pushes down the Frames Per Second (FPS). The usual solution would be to use a Vertex Buffer Object (VBO) accompanied with an Index Buffer Object (IBO) for the indices. After trying several different tutorials and functions, I couldn’t get the model to draw on screen. This led me to look for other solutions. I found the, by now deprecated, Display List feature in OpenGL. As far as I know, this function records the Immediate Mode steps in a list and makes it possible to call the list using
[code language=”cpp”]glCallList(m_listId);[/code]
This was quite fast as well, making it easy for me to load several models in the game with still a really high FPS. For the upcoming projects, I want to start using VBO’s and IBO’s though. For the bubbles in this game, I used a cone billboarded towards the camera. The shader uses the normals to determine transparency and the colors. This seemed a bit more efficient than having 1000 spheres in a game.
Shaders
I found programming the shaders quite an enjoyable thing to do. I used GLSL for this project, and with it I made a shader for my bubbles, a shader for explosions (illuminating), some standard diffuse shaders with texture capabilities, and a shader for the wavy water. I will talk about the bubble shader and the wavy water.
Bubble Shader
The bubble shader uses the camera position and checks how much the normal points towards the camera using the Dot-product. It then adds more red and green the less it points towards the camera. It also reduces alpha if it points towards the camera. This gives the impression of a bubble which you can see through, but is still visible by its edges. It then adds some lighting to these bubbles. I tweaked this to make them look a bit less dull and overall, I’m quite satisfied with the result.
Wavy Water Shader
The wavy water shader makes vertices on an object translate upwards depending on a given time value and it’s vertex Z-position. At first, I multiplied the sine of the time value by the Z-position, but this led to water waving a lot faster the further away you were from Z = 0. This is why I added the sine of Z/10 to the sine of time. This always gives an offset, making the wave work correctly. The amplitude of the waves is quite subtle in my opinion. This is because the objects will not go up and down depending on the waves and this covers it up a bit. It’s subtle enough to not be annoying and visible enough to give it an extra touch to the game.
Optimizing
Culling
Apparently, trying to render a complete scene with thousand bubbles in it isn’t really efficient. This bogged down the FPS to something that was unplayable. To fix this, I needed some form of culling. Frustum culling was a bit too hard for me at that moment. I used two forms of determining if I should draw something. At first, check if it is behind the camera. If that’s the case, don’t draw it. If it isn’t the case, check for the distance. If the distance (squared, to keep it a bit faster) is greater than a certain amount, don’t draw it as well. These methods worked fairly well in keeping my FPS decent in areas where there weren’t a lot of bubbles. Whenever I ran into areas with lots of bubbles, the FPS started to drop. Tweaking my waypoints (where the bubbles and mines spawn around) fixed this issue.
QuadTree
Not drawing all those objects helps for maintaining a decent FPS, but having a thousand bubbles constantly checking collision with eachother and the scene isn’t a practical solution as well. The first thing I did was create a QuadTree containing all static objects. The walls and mines are put into this tree and every object is checked against this quad tree. This helps quite a lot, but not enough. There are still a lot of dynamic objects in the scene. I couldn’t really find a good solution for this problem, which is why I create a QuadTree containing the dynamic objects every frame. This can be terribly slow, because of the amount of bubbles. This led me to use a hacky solution. If the dynamic object isn’t in range of the player, it isn’t updated nor pushed in the dynamic QuadTree. It’s hardly noticeable if you don’t know this and really helps for stabilizing the FPS. These solutions combined keeps my FPS above 50 in intense parts on my laptop and even more on other computers I’ve tested it on.
Smart Pointers
This was the first project where I’ve tried to use Smart Pointers intensively. There are still some leaks in the game, which I couldn’t find, but I’ve managed to reduce them a lot. I used unique pointers for the Singletons and shared pointers for any static or dynamic object. It is such a delight to only have to erase objects from a vector to get them removed and not constantly filling in destructors. The next project will be a challenge for me, to make it contain as few raw pointers as possible.
Singletons
For my projects, I use Singletons extensively. I have Singletons for containing textures, sprites, entities, audio, and input. During this project, for every Singleton I had to copy/paste several things to get it to work. I now have a Singleton base-class using templates. The only thing that you need to do in a derived class is inherit from it and declaring the Singleton<type> a friend, to be able to call the constructor, which you will want private to prevent multiple instances. Example of how to inherit from it:
[code language=”cpp”]class ShaderManager : public Singleton {
friend class Singleton;[/code]
And to use the Singleton you just use:
[code language=”cpp”]ShaderManager::GetInstance()->DoStuff();[/code]
So, the header file containing this class can be used in any project. It uses a unique pointer, which you could reset to get rid of the instance. This is the Singleton-class I’m talking about:
[code language=”cpp”]#pragma once
#include <memory>
template <class Type>
class Singleton
{
public:
virtual ~Singleton(void){}
static Type* GetInstance(void)
{
if(single.get() == nullptr)
{
single = std::unique_ptr<Type>(new Type());
return single.get();
}
else
{
return single.get();
}
}
static void Reset(){single = nullptr;}
protected:
static std::unique_ptr<Type> single;
};
template <class Type>
std::unique_ptr<Type> Singleton<Type>::single = nullptr;[/code]
Conclusion
This was a project in which I did a lot of stuff I haven’t done before. It was a great experience and I learned a lot about OpenGL, shaders, Smart Pointers, and an overall decent architecture. In the end, the code base got a bit messier than I had hoped, but the overall result is something I am quite proud of. The next project will feature the use of VBO’s, IBO’s, more math (since I won’t be using deprecated OpenGL anymore), and perhaps more fancy shaders. I will also try to stick to using only Smart Pointers and avoid raw pointers overall. This was also my first post-mortem, which is an experience itself. Normally, writing such a piece of text requires me to force myself to do it. I believe this will help me in overcoming the hurdle of having to write documents and larger pieces of text. Writing these posts will hopefully also improve my English over time. I hope you’ve enjoyed reading my first post-mortem. If you have made it to this point, thanks for reading! You can check out the code at GitHub and check the portfolio piece here.